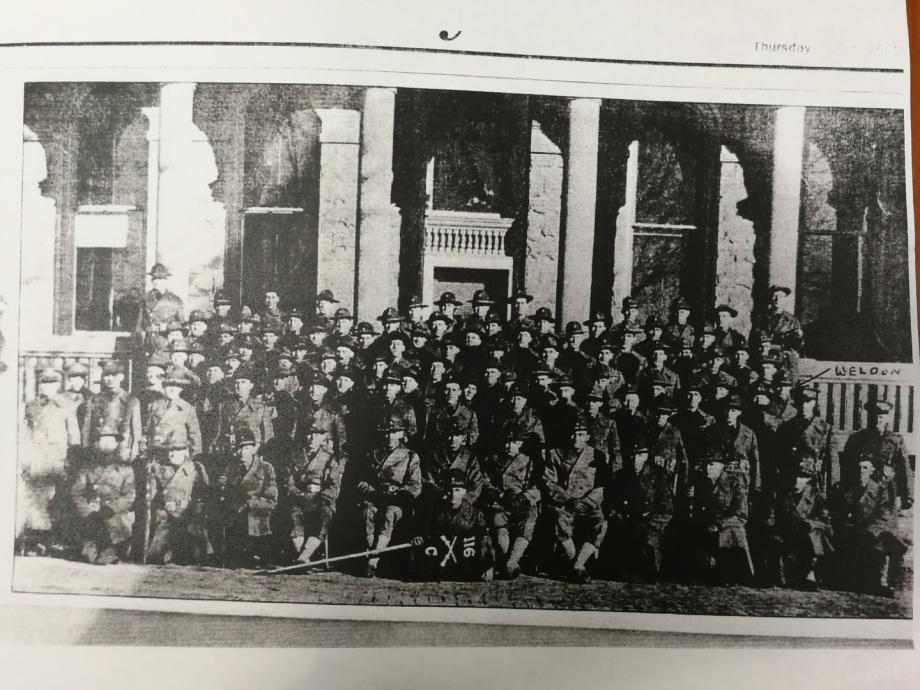
The Real C Company
We are still researching and piecing together the full history of C Company on D-Day as many records are lost or no longer exist. A lot of research involves cross referencing other documents along with the extremely valuable morning reports available from the National Archive Baltimore.
Below is what we have found to be the chain of command on D-Day for C Company:
|
Chain of command: |
|
|
|
|
|
Hawks |
Berthier |
B |
415402 |
Capt |
|
Bedell |
Robert |
J |
1291938 |
1st Lt |
|
Dallas |
Thomas |
R |
1290723 |
1st Lt |
|
Blankenbaker |
Albert |
S |
0467839 |
2nd Lt |
|
Kimbrough |
Orman, Jr |
L |
01299754 |
2nd Lt |
|
Park |
Francis |
G |
0442869 |
2nd Lt |
|
Schwartz |
Stanley |
H |
01298447 |
2nd Lt |
|
Ward |
Theron,Jr |
|
0483739 |
2nd Lt |
|
McClure |
Alfred |
B |
33043459 |
1st Sgt |
|
Hering |
Edwin |
O |
20364140 |
S Sgt |
|
Moubray |
Ted |
F |
20364146 |
S Sgt |
|
Lilly |
Jack |
D |
33047966 |
S Sgt |
|
Cox |
Alvin, Jr |
|
33046730 |
S Sgt |
|
Lawson |
Lawrence |
C |
20364000 |
T 5 |
|
Huffer |
Weldon |
D |
20364111 |
S Sgt |
|
Topolski |
Albert |
V |
33152995 |
Sgt |
|
Palimbas |
Anthony |
J |
33153126 |
Sgt |
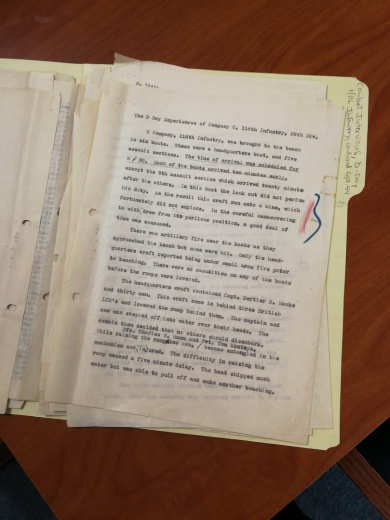
The Original C Company after action report located in the Archive. During our research we found that there were older versions of the report which contained more detail on certain events. These details were taken out of the final version of the report but they shed more light on a few things that happened to C Company on June 6th.
Along with this we found veteran testimonies from key members of C Company on D-Day written during a group interview on March 19th 1945 we can begin to put together what happened in decent detail.
From the reports we know that C Company boarded the Empire Javelin at Portland and were to use 6 LCVP landing craft to land at DOG GREEN sector. The 6 LCVP landing craft came from the USS Thurston as A, B and D companies used the LCA landing craft attached to the Empire Javelin. If you look at the D-Day landing diagram you can see that C Company had 7 LCVP's allocated to it however the 7th boat was not used and was likely a spare as all the reports state that they came in on 6 boats.
The boats were split into 2 Assault Sections designated Assault Section 1 and 2. The remaining 4 LCVP's were designated Support Sections.
According to the testimonies C Company appears to have deviated from the Assault Training Centre protocol for boat teams. We know that in C company the testimonies state that they had 2 Assault Sections and 4 Support Sections as they call them. In the testimonies it appears that only the 2 Assault Sections in C Company had the flame throwers and bazookers. (Evidence also states that 3rd Battalion also had the same issue which was caused due to shortages in the weapons) It appears that the 2 Assault Sections both had a 60mm mortar as per the assault training centre guidelines. We have the testimonies that of the remaining 4 LCVP's, 1 contained the 3rd remaining Company 60mm mortar and the other 2 carried the 2 company weapons platoon 30 cal machine guns. the last LCVP contained the HQ element and Capt Hawks.
C Company was made up of 4 platoons, one of which was the weapons platoon and contained 3 x 60mm Mortar teams and 2 x 30 cal Machine gun teams. The weapons platoon was split up amongst 5 of the 6 boats and the 3 Rifle platoons were distributed between all of the boats. Once the beach was taken and the fighting moved inland, the boat teams were suposed to convert back to regular platoons.
Below is what C Company's boat teams were assigned:
Assault Section 1 equipment:
- Flame Thrower
- 60mm Mortar
- Bangalore Torpedos
- Pole Charges
- Rifle Grenades
- Bazooka
- Pack Charges
Assault Section 2 Equipment:
- Flame Throwers
- 60mm Mortar
- Bangalore Torpedos
- Pole Charges
- Rifle Grenades
- Bazooka
- Pack Charges
Support Section:
- 60mm Mortar
- Bangalore Torpedos
- Pole Charges
- Rifle Grenades
- Pack Charges
Support Section:
- 30 cal Machine Gun
- Bangalore Torpedos
- Pole Charges
- Rifle Grenades
- Pack Charges
Support Section:
- 30 cal Machine Gun
- Bangalore Torpedos
- Pole Charges
- Rifle Grenades
- Pack Charges
Support Section:
- HQ
- Bangalore Torpedos
- Pole Charges
- Rifle Grenades
- Pack Charges
The Landing:
Prior to 06:53: (No accurate time was recorded for the first LCVP to land on the beach)
Assault Section 2 is the first to land however hits a submerged obstical and spills all of the men and equipment into 4 - 5 feet of water. Assault section 2 looses all of its special equipment in the process. The men get to shore and make their way to the low timber sea wall (Dog White Sector)
Assault Section 1
Support Section
Support Section
06:53:
Support Section lead by 2Lt Schwartz lands, they make their way to the timber sea wall. 2Lt Schwartz mentions the time of his craft landing to Sgt Huesser as the ramp goes down.
Support Section
It didnt take long for all the boat teams to assemble around the timber sea wall. The next task was to break out of this position and move inland.
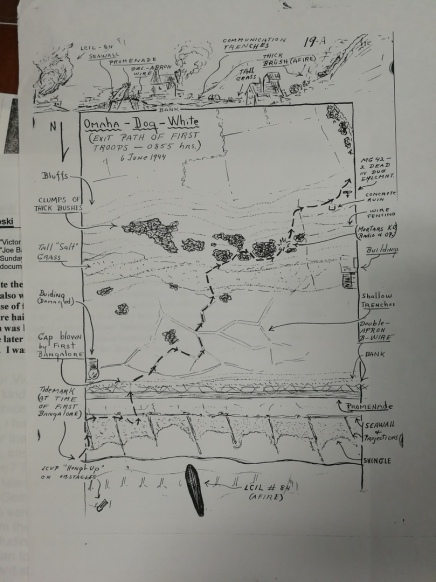
C Company was pinned down at the timber wall, General Cota joined them along with the 29th HQ team. Cota told 1Lt Robert Bedell that they had to get moving, Bedell was more to the left section of timber wall and ordered his Assault Section 1 boat team to start cutting the wire that blocked their path off the beach and over the road. At the same time on the right side of the timber wall another gap is being blown using a bangalore torpedo.
Mystery #1
Who was where?
The following accounts recall how C Company got off the beach:
C Company after action report.
Group interview notes written in 1945.
Veteran testimonies.
There are likely mistakes in all of these pieces of evidence either due to memory fading over time or too many facts from too many sources condenced into a short document. Here we are going to try and figure out the most likely truth if its even possible.
Source 1: C Company after action report quote -
"To the right of the company was a gap in the sea wall. Pvt. Ingram E. Lambert led off by crawling through this gap, then raised up, jumped a strand of barb wire, crossed a road and stopped at a barbed wire entanglement on the far side. This wire was of the double apron type and had to be blown. Pvt. Lambert set a bangalore torpedo but was killed by machine gun fire before he could set it off. Lieutenant Stanley H. Schwartz followed and set off the charge."
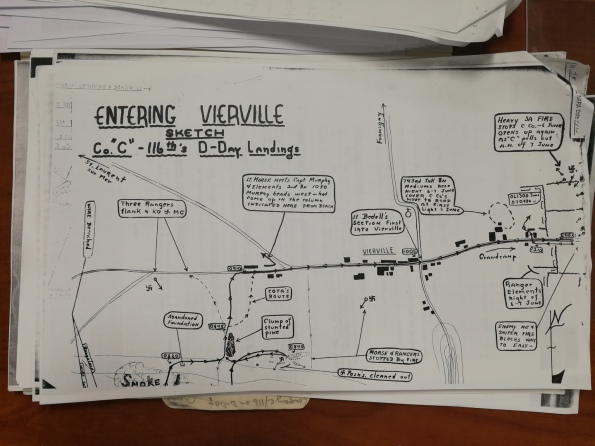
This report points to Pvt Lambert having set the bangalore and was killed in the process. We know for a fact that Pvt Lambert lost his life on June 6th. This account also reads like the map pictured above with the company to the left of LCI 91 (map states LCI 84 which is incorrect - see the more accurate map below)
Source 2: Group interview notes 1945 -
"The bangalore that was mentioned in Gen Cota's story was placed by the men of Lt Schwartz's support platoon. The last section was placed by an unidentified enlisted man. He pulled the friction ignitor and scuttled back to the cover provided by the sea wall. The bangalore didn't blow, and Lt Schwartz after waiting two or three minutes the 25 second fuse to blow, crawled over to the bangalore for a second attempt at detonating it. He came back, the bangalore blew and the men started to go through the gap.
The interviewed men could not remember the name of the first man through, but they stated that he was hit by a hail of lead. And that he was the only assault man to get hit as he passed through this particular gap."
This report does not mention the bangalore man ever being killed. The interview for this evidence was written in 1945 with a number of C Company men who were there that day. It contains more detail than the after action report however was written after the event. It is safe to say that 2Lt Schwartz definitely detonated the bangalore on the right hand side as both accounts report this.
Source 3: Group interview notes 1945 -
"The men of C Company who were over on the section of beach lay between the two knocked out LCI's, moved through at least two gaps in the wire. The personnel at the gap that was cut by Capt Bedell's (LT on June 6th) section, never realised that there was one that had been blown by a bangalore, at about the same time, 25 or 30 yards to the right.
Assault section #1 (shortly after Cota mentioned to Bedell that someone had to get moving.) Started forward to cut the strands of wire that blocked passage across the width of the paved road. Bedell with PFC's Lambert and Pat O'Keefe, cut the wire with wire cutters and men from their section started through, passing over the road and moving into the system of shallow communication trenches that had been dug into the flat, sandy surface of the flat ground that stretched from the inland side of the embanked road, to the foot of the bluffs."
This quote from the same report as Source 2 confidently states that Lambert and O'keefe cut the wire on the LEFT side using wire cutters at the same time the bangalore was detonated on the right hand side. It is worth mentioning that Robert Bedell was one of the C Company officers interviewed in 1945. It is also worth noting that Robert Bedell was the only member of Assault Section #1 present at that group interview, however Sgt Huesser who was in 2Lt Schwartz support boat was also present and would have likely corrected the interviewer if Lambert was indeed the one who planted the bangalore on the right side. So this account is quite strange as its the only one not mentioning Lambert being killed and is the ony one mentioning a 2nd gap in the wire.
We have more sources stating Lambert was with Lt Schwartz, though these accounts do not mention which gap of the 2 they were at except the one above which seems to indicate Lambert was on the left side gap with no mention of Lt Schwartz.
In my opinon this report is possibly mixed up, having being taken from the interview notes of 45 which were then formed into a series of events by the interviewer who may have made a mistake? As to which gap Bedell was at I cannot for sure say but the account above would seem to sugest he was at the left side gap but then later states he was with Lambert and Pat O'Keefe.
One way of looking at this is that all of them are at the left side gap and the gap on the right was blown by unknown GI's???
Source 4: Bob Laury 1997 -
"I remember very few of the men or 'boys' in Company C. There was a kid by the name of Lambert, and we were pretty good friends. He was killed on the beach, trying to cut through the barbed wire entaglements so we could advance further up the beach."
Bob Laury was in Captain Hawks's HQ LCVP and was friends with Ingram E Lambert. He must have been near him as they cut the wire and it would appear that to his memory Lambert is killed cutting the wire. This source would also support the case that Bedell, Lambert, Laury, O'Keefe and Shwartz might have all been together at the same gap.
Source 5: Raymond Scheuerer -
"Just slightly down the beach there was a gap in the seawall protected by a double layer of barbed wire that had to be cleared with a bangalore, an explosive device designed for just such a task.
Scheuerer recalled the incident easily.
There was a guy named Lambert, and he was a wire cutter. He slid a bangalore under the barbed wire. He was 19. He put the ignitor in it, but he got hit by a machine gun. They killed him. A Lieutenant got in there and blew the wire, then there was a drop down, then in grass about knee high, following each other. We were worried about mines."
Scheuerer's account also confirms Lambert was killed and that Lt Schwartz was with him.
In conclusion to the mystery of who was where I think its safe to say that its still a bit inconclusive and that more research is required to be able to say with certainty. In my own personal opinion I think that they were all at the same gap in the wire blown by Lambert and Schwartz and the 2nd gap was possibly blown by unkown GI's from either C Company or perhaps a different company all together.
Known C Company Deaths on June 6th:
George Robert Losey
Ralph Hoyte Hubbard
Ingram E Lambert
John H Radziejewski
Thomas R Dallas Jr
Harry C Gunter
Zigmund Horodecki
Stanley H Schwartz
Ted F Moubray
Leo E King Jr
We can now try and work out the locations of some of the C Company heros who lost their lives on June 6th by using the reports and testimonies.
The after action report states:
"Pfc. Ralph Hubbard and Pvt. George R. Losey were killed by machine gun fire while crossing the road"
(The road after the sea wall)
"When the first platoon was within thirty yards of the gun without seeing it, the machine gun opened up. Lieutenant Schwartz, S/Sgt. Ted F. Mouray, and Pfc. Leo King were killed"
(The field far left of the road leading to Point Du Hoc and out of Vierville)
"Pvt. Lambert set a bangalore torpedo but was killed by machine gun fire before he could set it off."
(Confirmed by various accounts, we know that Pvt Lambert died attempting to detonate one of the bangalores on the beach.)
"Lieutenant Tom Dallas of “C”, who had come in to make a reconnaissance, also jumped out. He got to the edge of the sand and was there shot to death."
This quote is taken from B Companies D-Day after action report and mentions that Tom Dallas from C is in the HQ boat, we are not sure why he was in this boat though we do know that personnel from the 29th Cavalry reconnaisance were in the A company boats to make reconnaissance. Perhaps 1Lt Dallas was attempting the same thing as C Company were supposed to land behind B Company on Dog Green, he may have planned to report back to Cpt Hawks on the situation as soon as C Company landed which would have given them first hand info.)
"A few bursts of automatic fire, and several well aimed sniper shots killed three men and the collumn huddled into the ditches"
This quote comes from the group interview though does not name anyone specifically we do have 3 C company KIA left who are not mentioned anywhere. It is possible that these remaining 3 names: Radziejewski, Gunter and Horodecki are these three men. If this is correct then they lost there lives on the main road leading West out of Vierville a few hundred meters from the crossroad.
Radziejewski, Gunter and Horodecki are the only C Company personnel that are not mentioned by name in any reports that we can find.
In the end the only thing we do know is that it was an extremely chaotic day and many men lost their lives. We will continue to research C Company and their achievements on D-Day and perhaps we will find more evidence that will shed more light on what exactly happened that day.
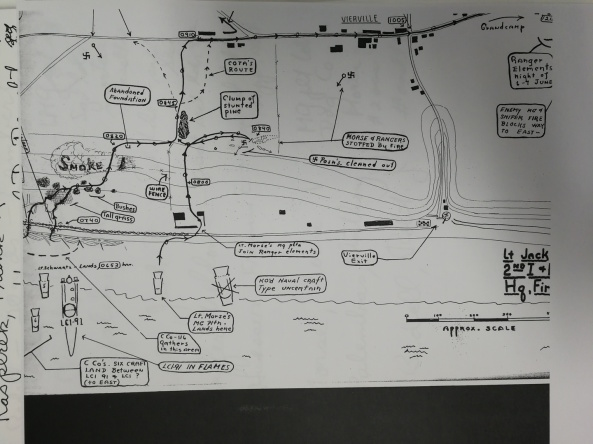
Another scetch made during the interview with C Company D-Day veterans in 1945.
Unfortunately we do not have the other half of the map that would show more of the landing craft order of beaching.
We can see however the routes taken by C Company up the bluff.
The rangers and Cota break off as they approach the main road leading into Vierville.
You can also see the route of Lt Morse from D Company as he was also present during the interview with C company.
Once C Company had crossed over the road, 1Lt Bedell lead the way up the bluff with Assault Section #1. The rest of the company followed along with elements of the Rangers and General Cota's team.
There was thick smoke as they climbed the bluff which caused confusion and was so thick that C Company had to don their gas masks to get through it. the elements go their seperate ways once at the top.
Once at the top an MG42 was seen firing on them from the left side, General Cota gets a few volunteer Rangers who head off to take it out.
C Company then hit the main road and head towards the crossroad at Vierville. Lt Bedell and Assault Section #1 still in the lead they and reach the crossroad between 09:00 and 10:00hrs. Here Cota orders them to carry on moving along the road out of Vierville that leads to Point Du Hoc however they recieve fire from emplaced MG42's. C Company take cover in the ditches either side of the road and cannot move. Cota comes back over to find out why they are not moving and then sees the heavy fire coming from the 42's, he orders they find a way round them.
C Company pull back from the road and head through a courtyard and along another hedgrow to try and flank the 42 from the left side.
After taking casualties trying to flank the position C Company decide to hold their position along the right flank of Vierville.

